
Hi again,
So the first thing that I am sharing here is a button set that Mark uses in his courses. These buttons are currently found on the shared drive, but additionally I uploaded them onto a photo sharing site (picasa). I created a document with the image code and will walk you through inserting the buttons/icons into the course and week headers. The google doc with the code is found on the shared drive: Z:\Icons & Logos\buttons\img style.doc.
Click on the images below to enlarge them
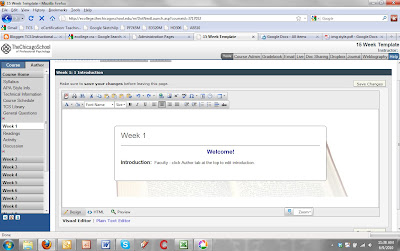 Here is the main screen. What we would like to do is put an icon by Week 1. Make sure you are in the Author window and in the HTML editor.
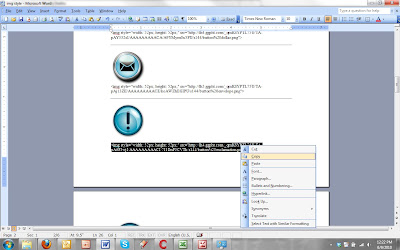 Find the icon that you would like to include and copy the code associated with it (underneath the icon)
 Paste the code into the html where you would like the icon. Normally this will be in the header. Put the img code between the brackets (it could also be depending on the header style).
 If done right, The image will appear beside the header.
Here are the components of the code:
img
This tag specifies to the html that you are inserting an image
style="width: 52px; height: 52px;"
This allows you to specify the dimensions of the icon. The original images are about 144 x 144. I reduced them for 52 x 52 for eCollege
src="http:// ">
This specifies where the image comes from. In this case I uploaded the image onto a public photo sharing site.
Troubleshooting
If you ever have problems copying and pasting the code from the Word document to eCollege, try copying the code into a plain text editor (such as wordpad or notepad), and then copy and paste the code from the text editor into eCollege. Sometimes copying straight from Word can be problematic as Word tends to format the text beyond what is immediate apparent. The lines of code in the document should be plain text, so you normally shouldn't have any problems copying and pasting directly from Word.
If done right, The image will appear beside the header.
Here are the components of the code:
img
This tag specifies to the html that you are inserting an image
style="width: 52px; height: 52px;"
This allows you to specify the dimensions of the icon. The original images are about 144 x 144. I reduced them for 52 x 52 for eCollege
src="http:// ">
This specifies where the image comes from. In this case I uploaded the image onto a public photo sharing site.
Troubleshooting
If you ever have problems copying and pasting the code from the Word document to eCollege, try copying the code into a plain text editor (such as wordpad or notepad), and then copy and paste the code from the text editor into eCollege. Sometimes copying straight from Word can be problematic as Word tends to format the text beyond what is immediate apparent. The lines of code in the document should be plain text, so you normally shouldn't have any problems copying and pasting directly from Word.
 Here is the main screen. What we would like to do is put an icon by Week 1. Make sure you are in the Author window and in the HTML editor.
 Find the icon that you would like to include and copy the code associated with it (underneath the icon)
 Paste the code into the html where you would like the icon. Normally this will be in the header. Put the img code between the brackets (it could also be depending on the header style).
 If done right, The image will appear beside the header.
I did notice those in one of his courses... thanks Sean.
ReplyDeleteAlso, what i usually do is simply put my cursor where i want the image (In Design mode) and use the Insert Image tool. Then browse for the Icon. Then i will right click and choose properties and change the size to 53x53.
ReplyDeleteI've got a concern, though -- this icon set doesn't appear to include some needed icons such as a 'calendar' or 'date' (which I would use for a page about an on-ground class meeting), and some kind of 'speech bubble' or something else appropriate for a discussion thread page. How have you been denoting these types of content with those icons...?
ReplyDeletemike